An EC2 instance gives you a virtual server that can run a website, application, development environment, or background service without buying physical hardware. In this practical guide, you will get started with Amazon EC2, choose sensible settings, connect securely, install a small web server, and clean up the resources when you finish.
This article is worth reading because it explains not only which buttons to click, but also why each choice matters. By the end, you will understand the costs, security settings, storage, networking, and lifecycle decisions behind your first server.
What Is an EC2 Instance, and How Does Amazon EC2 Work?
Amazon Elastic Compute Cloud is the on-demand compute service offered by Amazon Web Services. Instead of purchasing a physical machine, you rent virtual CPU, memory, storage, and networking capacity. You can start small, resize when demand grows, and pay according to the resources and pricing model you select. This elastic approach makes the service useful for learning, testing, business applications, APIs, and websites.
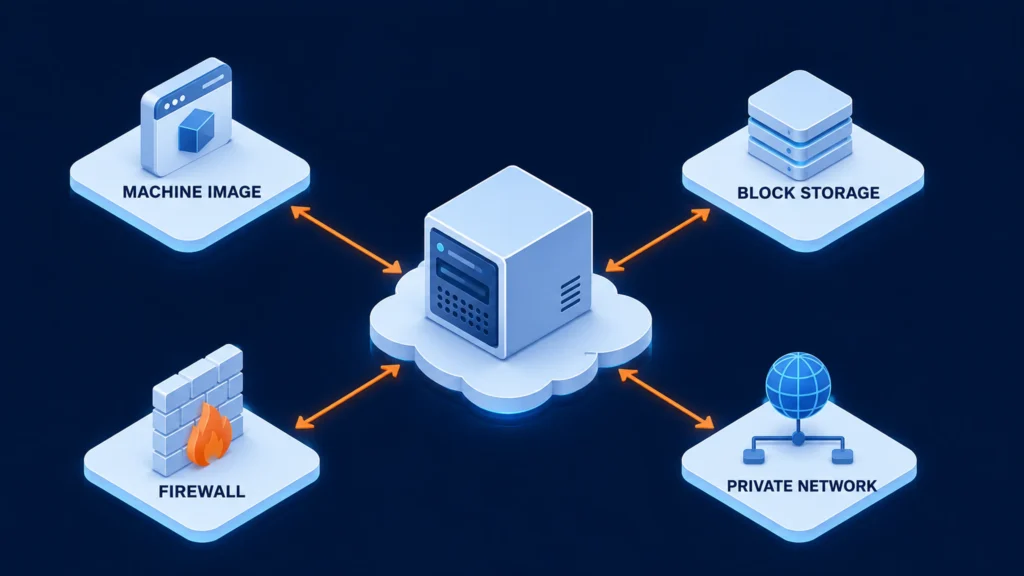
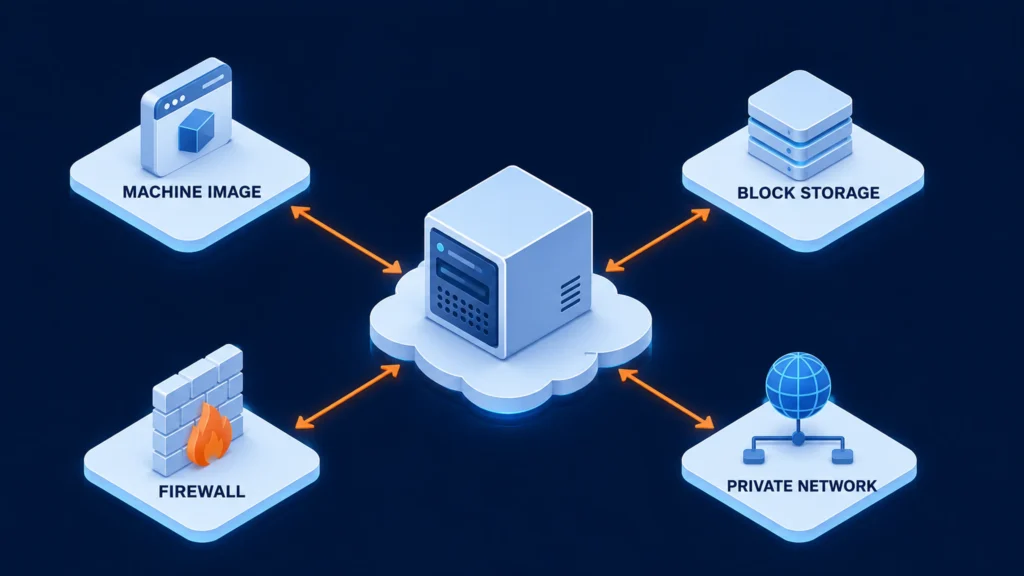
Every virtual machine begins with an Amazon Machine Image, or AMI. The image supplies the operating system and may include preinstalled software. You then select an instance type, storage, network, and security rules. An Amazon EC2 instance can be launched in minutes and managed from a browser, automation tools, or an API.
It helps to separate the major building blocks. The machine supplies processing power; Amazon EBS commonly provides persistent block storage; a security group acts as a stateful virtual firewall; and a virtual private cloud gives the server its isolated network. Together, these services create a flexible server in the AWS Cloud.
What Should You Prepare Before You Get Started with AWS?
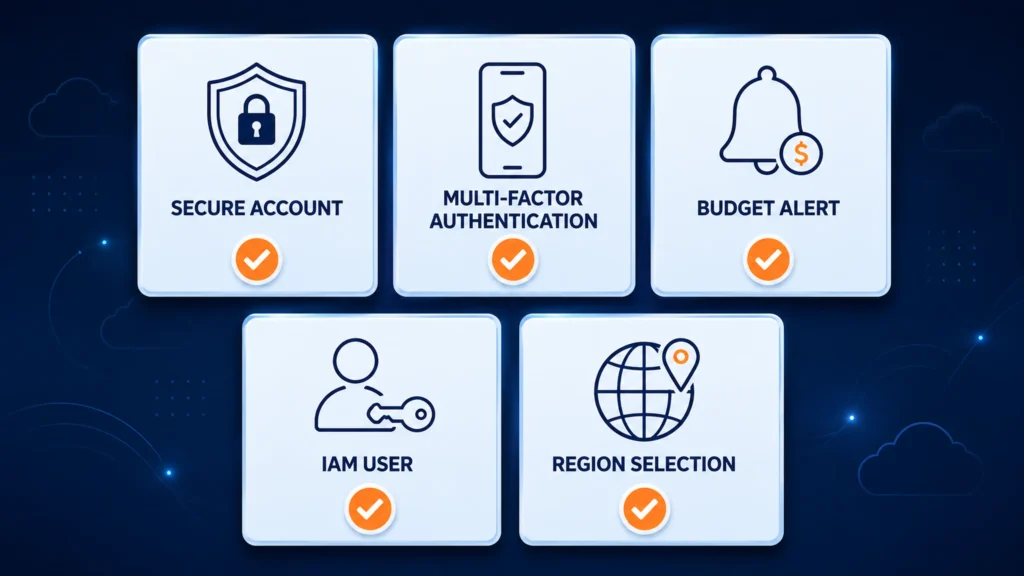
You need an active account, permission to use the required services, and a suitable Region. Once you have created your AWS account, sign in with an IAM identity rather than using the root user for everyday work. Enable multi-factor authentication, create a budget alert, and confirm that your chosen Region supports the resources you plan to use.
Open the AWS Management Console, search for EC2, and check the Region selector near the top of the page. Resources are regional, so a server launched in Mumbai will not appear in the instance list when the console is showing Northern Virginia. Pick a nearby Region when latency matters, but also compare service availability and pricing.
For this tutorial, you need permission to manage virtual machines, security groups, storage, and a key pair. Keep billing access available so you can monitor usage. These small preparations prevent the two most common beginner problems: launching in the wrong Region and discovering unexpected charges later.
Is Your Amazon EC2 Server Covered by the Free Tier?
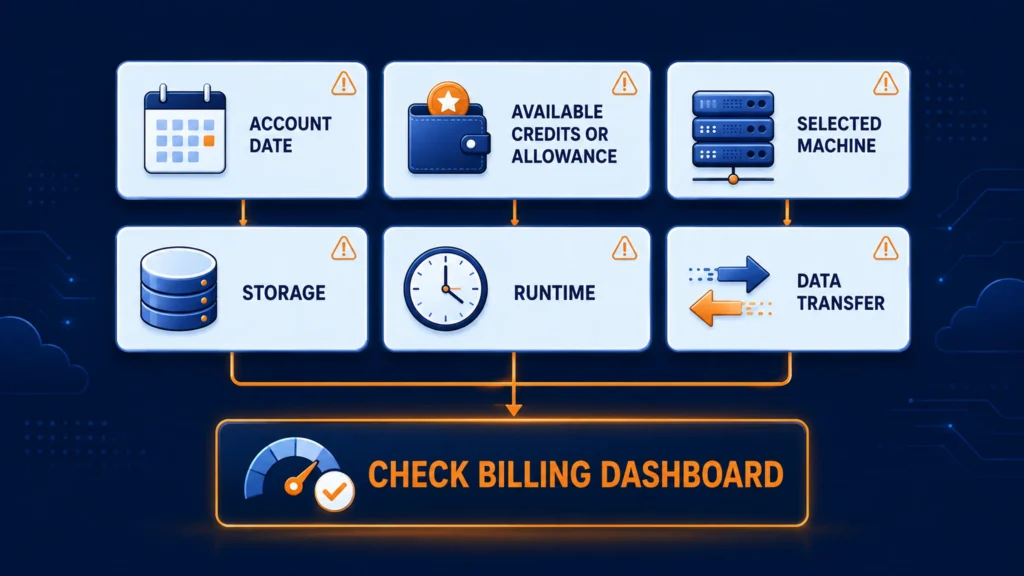
Do not assume that every small server costs nothing. Free Tier eligibility depends on factors such as the date you opened the account, the selected image and size, consumed credits or allowances, storage, data transfer, and how long the server runs. The console normally displays a Free Tier eligible label on qualifying choices, but you should still review the Billing dashboard and current AWS pricing page.
The account rules changed on July 15, 2025. Newer accounts may receive credits and choose a free plan for a limited period, while qualifying older accounts may be covered by the earlier 12-month AWS Free Tier model. Older guides often mention a t2.micro EC2 server, but the qualifying size can differ by account, Region, architecture, and current program rules. Select only what your own console marks as eligible for the Free Tier.
You may encounter older wording such as free tier benefits for Amazon or tier benefits for Amazon EC2 in documentation and search results. The practical rule is simpler: confirm your personal eligibility before deployment. If you are no longer covered or exceed the allowance, you can incur the standard Amazon EC2 usage fees while the machine is running, plus charges for items such as storage or public IPv4 addresses.
How Do You Configure the EC2 Instance Configuration?
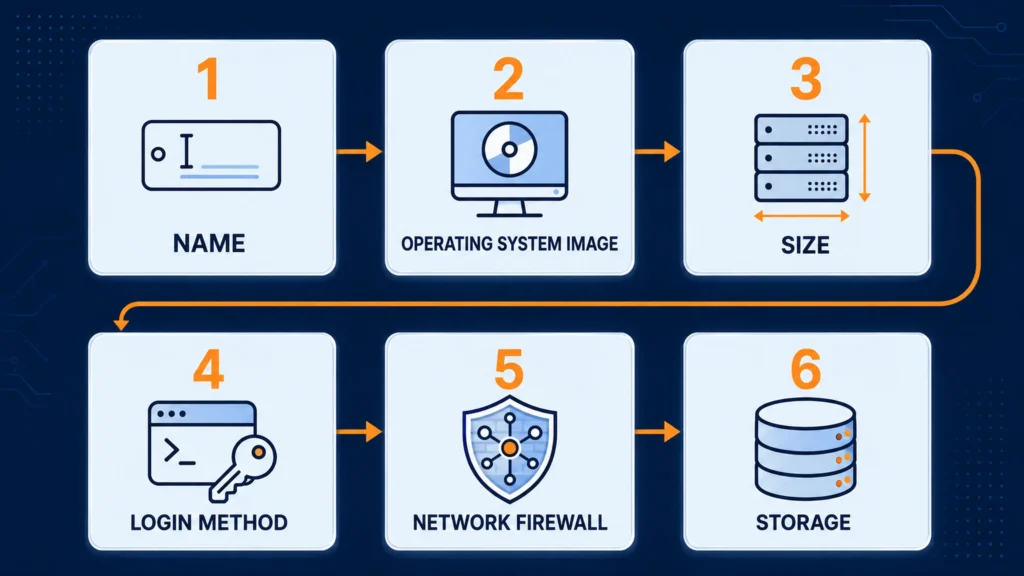
From the service dashboard, choose Launch instance and enter a clear name such as beginner-web-server. Under application and operating-system images, select a supported Amazon Linux image if you want to follow the commands in this guide. Check its architecture and eligibility label rather than copying an old image ID from another tutorial.
Next, choose the instance type shown as suitable for your account benefits and workload. A tiny general-purpose size is usually enough for a basic practice page. For production, estimate CPU, memory, network performance, architecture compatibility, and expected traffic instead of choosing only by price.
Under key-pair settings, create and download a new key pair if you plan to use SSH. Store the private key securely because the service will not offer the same private file again. Browser-based connection methods may reduce the need to manage a local file. Although the wizard can let you proceed without a key pair, do that only when you have deliberately set up another supported access method. Think of this section as your create EC2 instance checklist.
How Should You Set Up Networking, Security, and Amazon EBS Storage?
For a beginner lab, the default network is convenient, but you still need to understand exposure. Select a subnet that can provide the connectivity you require. If you need direct internet access, confirm that public addressing and routing are available. A production design may instead place the machine in a private subnet and provide controlled administration through a managed service, VPN, or bastion.
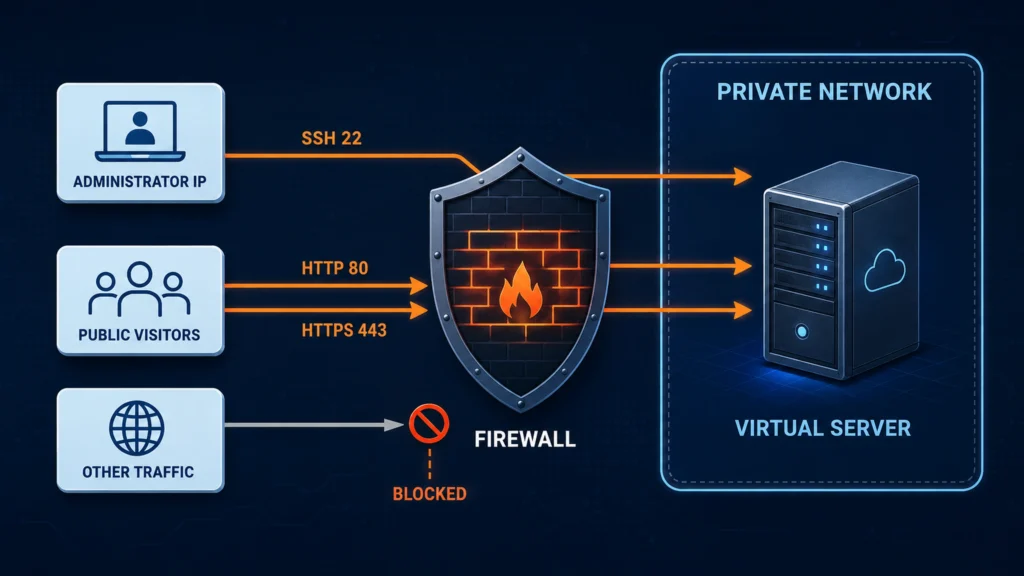
Create a security group that allows only necessary traffic. For SSH, allow TCP port 22 from My IP, not from every address on the internet. If you are building a public website, add HTTP on port 80 and, when configured, HTTPS on port 443. Never open database or remote-administration ports globally simply to make troubleshooting easier.
Review the root disk under storage. A small general-purpose EBS volume is enough for this exercise. Encryption is a sensible default. Also inspect the delete-on-termination setting, because attached Amazon EBS volumes set for deletion can disappear with the machine. Increase disk size only when the workload actually requires it.
How Do You Launch Your Instance and Check Its Instance State?
Before you launch the instance, review the summary panel, confirm the expected number of machines is one, and choose Launch instance. The console will display a success message and a link to the Instances page. This is the actual instance launch, so billing and quotas can begin applying as soon as the machine enters the running state.
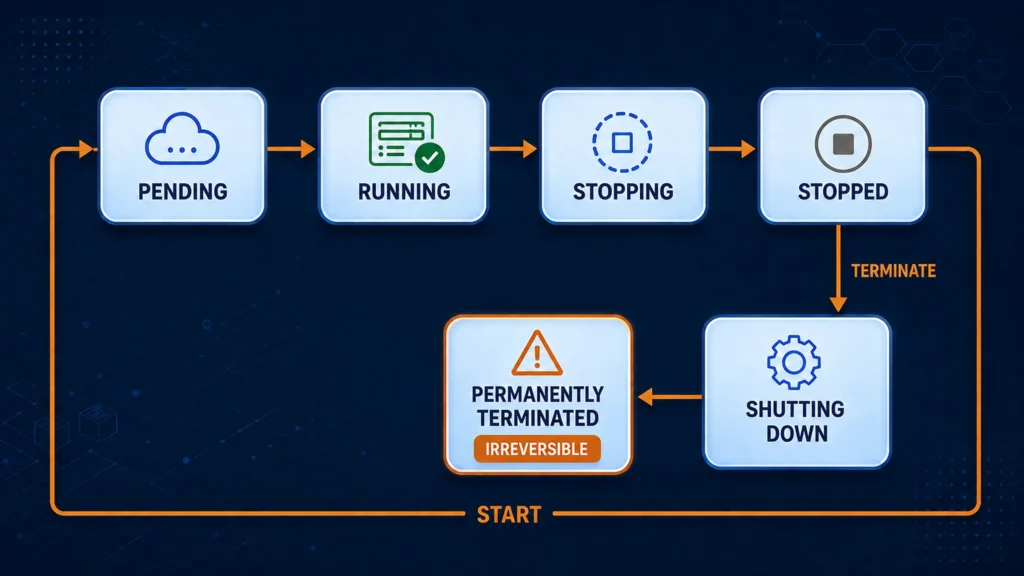
Select the new row and note the instance ID, public address, private address, Availability Zone, and security group. Its status typically moves from pending to running. Wait until both status checks pass before troubleshooting connectivity; a running label alone does not always mean the operating system has finished initializing. Tag the instance when it’s launched so its purpose and owner are immediately clear.
If the machine does not become healthy, inspect status-check messages, system logs, subnet routing, and the selected image. Avoid repeatedly clicking the launch button, as that can create duplicate billable resources. Tags such as Name, Environment, Owner, and Project make accidental duplicates much easier to identify.
How Do You Connect to Your Instance Securely?
Select the machine and choose Connect. Depending on the image, network, permissions, and installed components, the console may offer EC2 Instance Connect, Session Manager, or an SSH command. A browser connection is convenient for a lab, while Session Manager can provide managed access without opening inbound SSH when its prerequisites are correctly configured.
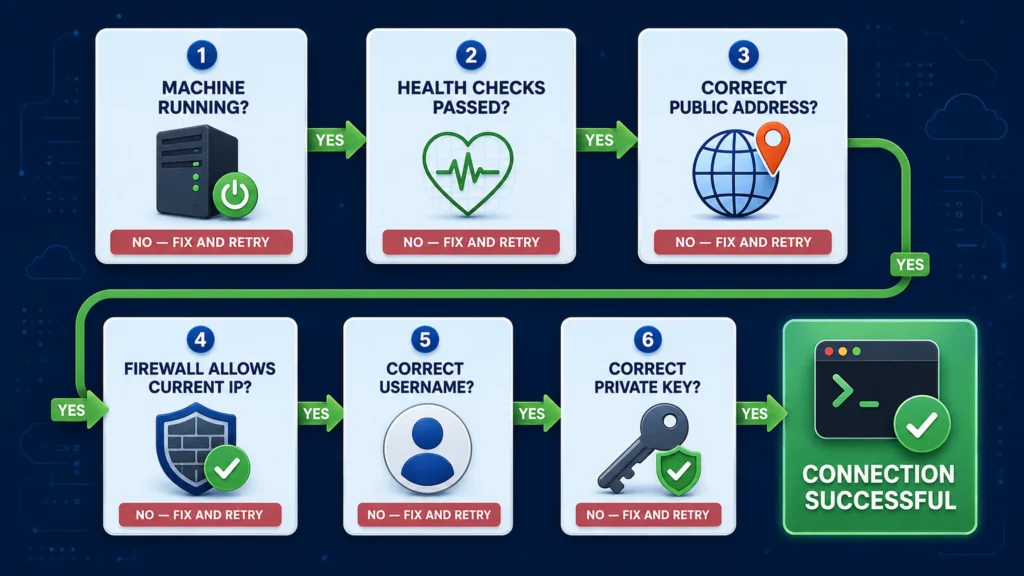
To connect to your instance through a local SSH client, restrict the private-key file permissions and use the username shown in the connection instructions. If you are accessing a Linux instance using SSH, the default name is often ec2-user, but it varies by distribution. Copy the exact command generated by the console rather than guessing the username or hostname.
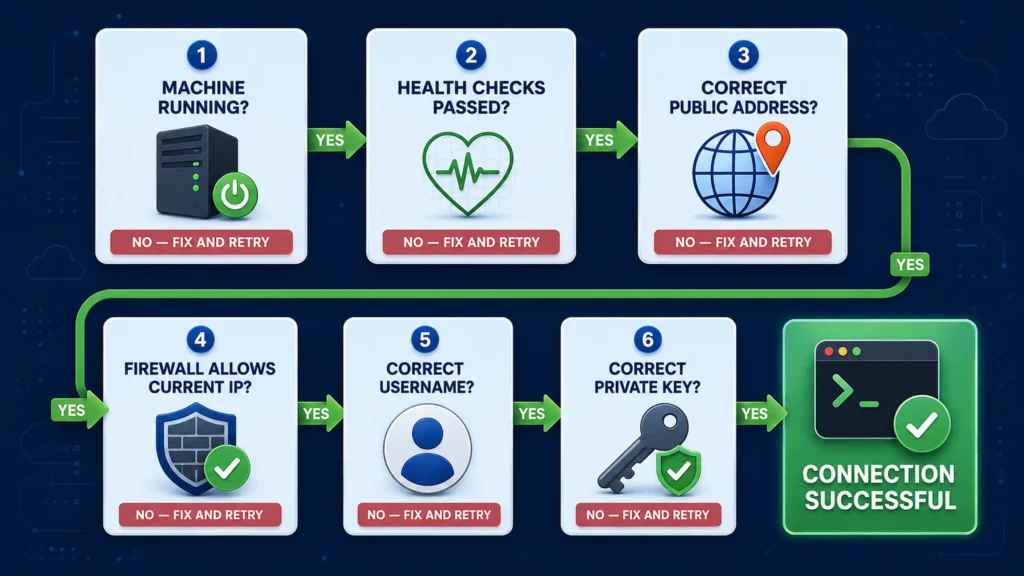
If access fails, check that the machine has passed its health checks, your current public IP is permitted on port 22, the route is valid, and the correct private key is being used. Do not solve a timeout by opening every port to the entire internet. Fix the specific network or authentication problem.
How Do You Install a Web Server on a Linux Instance?
After you connect to the instance, update the installed packages and install a lightweight server. On the chosen distribution, the following commands install and start Apache:
sudo dnf update -y
sudo dnf install -y httpd
sudo systemctl enable --now httpd
echo '<h1>Hello from my cloud server</h1>' | sudo tee /var/www/html/index.html
Open the machine’s public IPv4 address in a browser using http://. If the page does not load, confirm that Apache is running and that the security group permits inbound TCP 80. This exercise proves that network traffic can reach the operating system and that the process is listening on the expected port.
For a real website, add DNS, TLS, monitoring, backups, patching, and a deployment process. Do not place passwords or secrets directly in user data or source files. This small lab is a useful starting point, but production architecture requires stronger availability, observability, and security controls.
How Can Command-Line Users Manage the Server with the AWS CLI?
Command-line automation is valuable when you need repeatable deployments. Before running commands, install the current client, authenticate through a supported method, choose a Region, and verify the identity in use. Avoid hard-coding long-lived access keys in scripts or uploading credentials to a repository.
The following examples show how to inspect and clean up a machine. Replace the sample identifier with your real value:
aws ec2 describe-instances --instance-ids i-0123456789abcdef0
aws ec2 terminate-instances --instance-ids i-0123456789abcdef0
Creating an EC2 instance using a command requires several environment-specific values, including an image ID, size, subnet or security group, access method, and tags. Learn the console workflow first in your AWS environment, then translate the known-good settings into infrastructure as code. That approach is safer than pasting an unverified run-instances command from the web.
What Should You Check After You Launch an Instance?
First, verify health, reachability, and the intended application. Then review monitoring graphs for CPU, network, and status checks. Configure alarms for conditions that matter, centralize logs, and document who owns the resource. Add backups or image-based recovery if the data and configuration cannot be recreated easily.
Security also needs ongoing attention. Remove temporary firewall rules, patch the operating system, use least-privilege roles, encrypt data, rotate secrets, and inspect findings or logs. If the public address is only required during setup, consider whether a managed private-access option would reduce exposure.
Finally, review cost controls. A machine can generate charges even when nobody is actively using it. Storage, snapshots, data transfer, load balancers, and public IPv4 addresses may have their own pricing. Add cost-allocation tags and alerts so you can find forgotten resources before the monthly bill does.
Should You Stop, Terminate, or Delete the Server?
Stopping and deleting are different. A stopped EBS-backed machine can usually be started again, although its compute billing pauses and some related resources can continue to cost money. Use stop when you expect to need the instance later and want to preserve its boot volume and configuration.
To terminate an instance is to permanently delete the virtual machine. Before doing so, back up anything you need, inspect termination protection, and confirm what will happen to each attached disk. Then select the machine, choose Instance state, select Terminate (delete) instance, and confirm. This is how to delete your instance from the console.
Take a moment to see how instance termination works before using it in an important environment. Once termination begins, the machine cannot be started or recovered, and storage configured for automatic deletion may also be permanently removed. The row may remain visible briefly in the terminated state, but it is no longer usable.
Key Takeaways
- Choose the Region, image, machine size, storage, and networking for the actual workload—not simply the first defaults shown.
- Verify current cost eligibility in your own Billing dashboard; “Free Tier eligible” is conditional, not a promise that every related resource is free.
- Restrict inbound access to required ports and trusted sources, and protect private credentials.
- Wait for both health checks to pass before diagnosing connection problems.
- Monitor health, logs, security, backups, ownership, and cost after deployment.
- Stop a reusable lab when appropriate, but permanently terminate resources you no longer need after backing up required data.